Host ASP.NET MVC Application in a Windows Container in Docker
In an earlier post which I published a week go, went through the steps needed for setting up an IIS server in a Docker container running on a Windows Server 2016 machine. In this post, I will explain the steps needed to host an ASP.NET MVC application on a IIS server running inside a docker container based on Windows
Step 1 : Setup IIS with ASP.NET Support
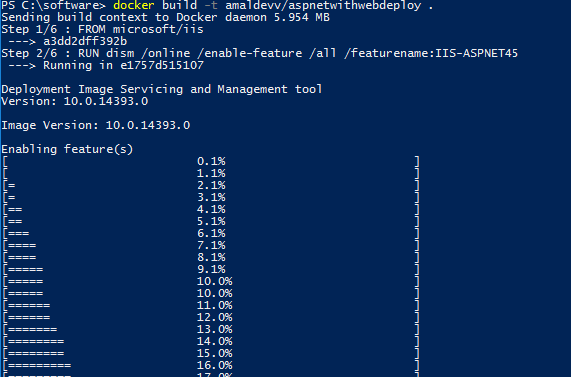
First, we will create a new image based on the official IIS image released by Microsoft. Because in that image features such as ASP.NET 4.5 and Microsoft Web Deploy are not installed by default and we need to have it for deloying our application. So download the installer package for Web Deploy from the Microsoft site and store it in a folder in your local machine. To create the image I have created a Dockerfile as given below
FROM microsoft/iis

RUN dism /online /enable-feature /all /featurename:IIS-ASPNET45

RUN mkdir c:\install

ADD WebDeploy_amd64_en-US.msi /install/WebDeploy_amd64_en-US.msi

WORKDIR /install
RUN powershell start-Process msiexec.exe -ArgumentList '/i c:\install\WebDeploy_amd64_en-US.msi /qn' -Wait
Let's create the image by executing the following command
docker build -t amaldevv/aspnetwithwebdeploy .
When the command is executed, it will first check whether image for IIS is available in locally in docker and if it's not found then will download it from Microsoft repository in Docker Hub. The second statement in the file is for installing the ASP.NET 4.5 feature and once that is finished it will create a folder named install in the container and then copies the installer package for Web Deploy which we downloaded earlier into it. After that msiexec process is called using Powershell to install Web Deploy inside the container
You can verify the images is successfully built or not by executing the docker images command as shown below

Step 2 : Create Image for our ASP.NET MVC App
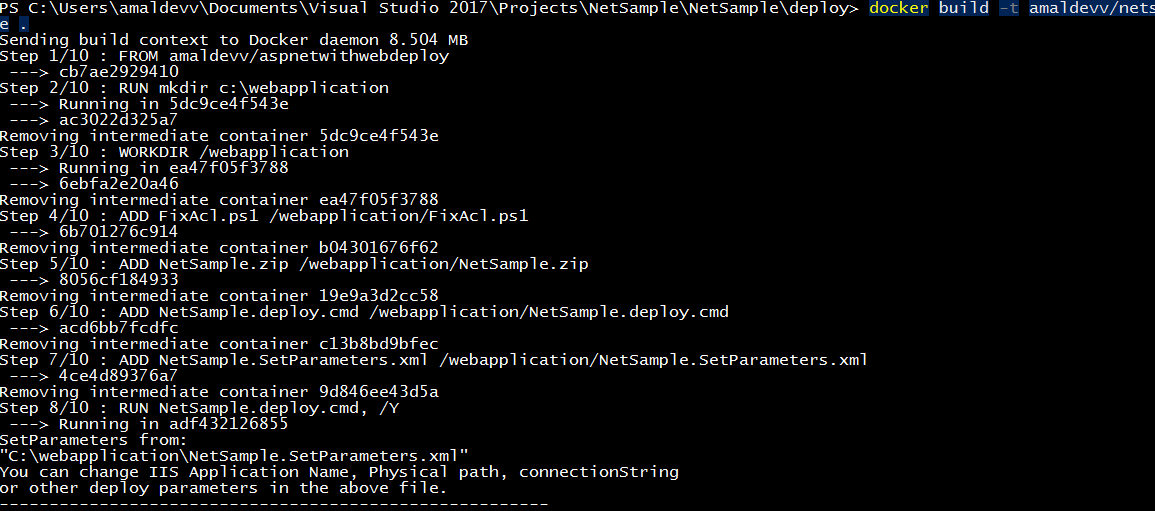
Let's now create the image for our application based on the image we just now created. Please note that we will be using the custom image which we created instead of the microsoft/iis image because we need to enable ASP.NET as well web deploy package in the image to host an ASP.NET Application. I have already created an ASP.NET MVC application in my local machine using Visual Studio and created Web Deploy Package using the Publish feature in Visual Studio. If you are not familar with this step, please refer the offical documentation here.
Given below is the Dockerfile which I used to create the image for our ASP.NET MVC application
FROM amaldevv/aspnetwithwebdeploy
RUN mkdir c:\webapplication

WORKDIR /webapplication

ADD FixAcl.ps1 /webapplication/FixAcl.ps1

ADD NetSample.zip  /webapplication/NetSample.zip

ADD NetSample.deploy.cmd /webapplication/NetSample.deploy.cmd
ADD NetSample.SetParameters.xml /webapplication/NetSample.SetParameters.xml

RUN NetSample.deploy.cmd, /Y

RUN powershell.exe -executionpolicy bypass .\FixAcl.ps1
RUN NetSample.deploy.cmd, /Y
The steps are pretty straight forward,
1. Uses the custom image as base image
2. Create a new folder named web application and sets it as current directory
3. Copies a powershell script file to the current working directory, I will explain the contents of it later in the post
4. Copies the web deploy package files from the local machine to the current working directory in the container
5. Executes deployment package
6. Executes the powershell script from the file we copied in Step 3
7. Executes the deployment package again
When I was creating the container for the first time, I got the below error while creating the container
“Error: This access control list is not in canonical form and therefore cannot be modified."
So after some googling found this powershell script to fix that issue from here. The contents is given below
$path = "C:\inetpub\wwwroot\NetSample"
$acl = Get-Acl $path
Set-Acl $path $acl
As mentioned in the fix, I need to execute the deployment package again to successfully create the image and that's why I am executing it again in step 7.
To create the image, execute the docker build command as given below.
Step 3: Run the Container to serve your application.
Once your image is successfully built, you can use the following command to create the container which will host the application in IIS inside the container
docker run -it -d -p 80:80 amaldevv/netsample
![]()
The above command will create the container and -p switch will ensure that all the requests coming into port #80 of your local machine to the port #80 of your container. If you experience connectivity issues, make sure that you expose the #80 if are running it in a VM azure or if your are behind any firewall

No Comments
Connecting Azure Blob Storage account using Managed Identity
Posted 12/9/2022Securing Azure KeyVault connections using Managed Identity
Posted 11/26/2022Manage application settings with Azure KeyVault
Posted 11/9/2022Adding Serilog to Azure Functions created using .NET 5
Posted 4/3/2021Learn how to split log data into different tables using Serilog in ASP.NET Core
Posted 4/23/2020