Learn how to split log data into different tables using Serilog in ASP.NET Core
For most of the application developers, file systems are the primary choice for storing the information generated by the logging providers. One of the main drawbacks of using the files is that it's very difficult for the search for information or to do an analysis of the information written to it over time. Third-party logging providers such as Serilog have facilities to persist the data in database tables instead of the file system. Even then, if you use a single table to write all you errors and other debug information, the size of the table will grow considerably over time which can affect the performance of the whole operation itself.
So, in this post, I will explore the possibility of using multiple tables for storing the logging information using Serilog. If you are new to Serilog, please refer to my previous articles on the same here using the links given below.
- Implementing Logging in a .NET Core Web Application using Serilog
- Rollover log files automatically in an ASP.NET Core Web Application using Serilog
- Write your logs into database in an ASP.NET Core application using Serilog
Code snippets in this post are based on .NET Core 5.0 Preview 5
Step 1: Create a Web Application in .NET Core
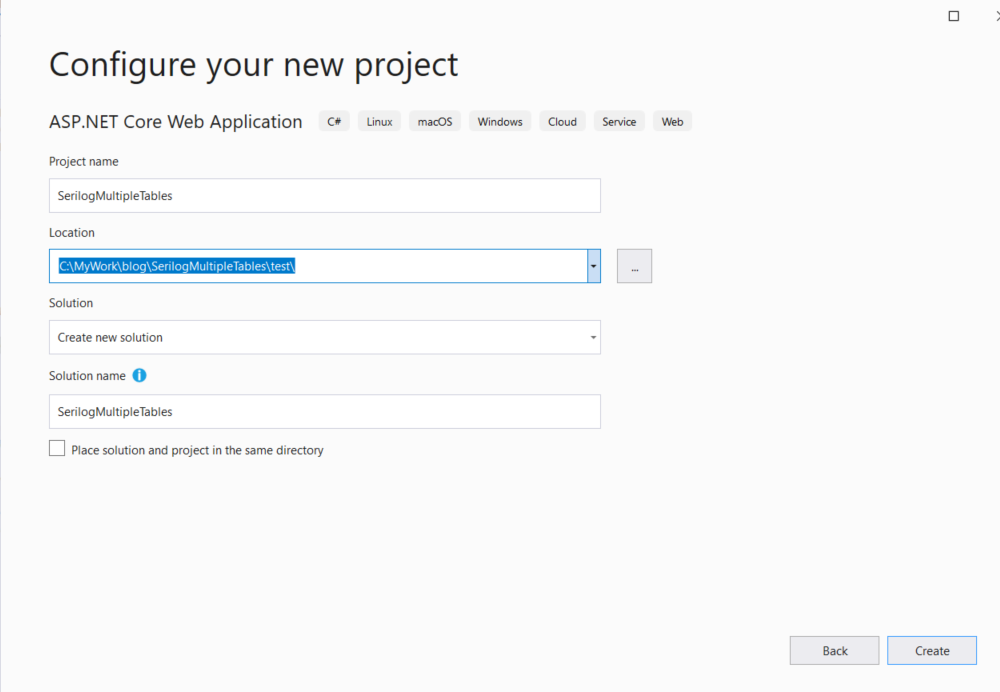
To get started we will create a new empty web application using the default template available in Visual Studio. Goto File -> New Project -> ASP.NET Core Web Application
Give a name for the application, leave the rest of the fields with default values and click Create

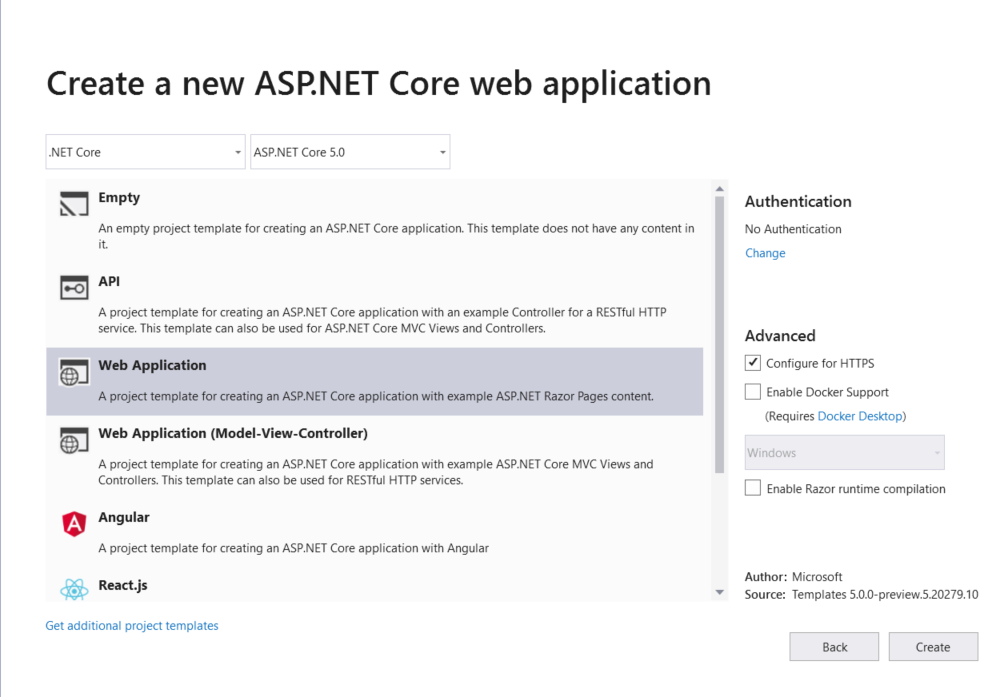
In the next window, select Web Application as a project template. Before you click on the Create button, make sure that you have selected the desired version of .NET Core in the dropdown shown at the top. Here, for this one, I selected .NET 5.0

You can also do this from .NET CLI using the following command
dotnet new web --name SerilogMultipleTablesWhen the command is executed it will scaffold a new application using the MVC structure and then restores the necessary packages needed for the default template.
By default, it will create two json files named, appsettings.json and appsettings.development.json. These are the configuration files for the application and is chosen based on the environment where your application is running. These files will have a default configuration as shown below basically sets the default level for logging.
{
  "Logging": {
    "LogLevel": {
      "Default": "Information",
      "Microsoft": "Warning",
      "Microsoft.Hosting.Lifetime": "Information"
    }
  }
}
By default, it is set as Information, which writes a lot of data to the logs. This setting is very useful while we are developing the application, but we should set it higher severity levels when the application is deployed to higher environments. Since Serilog is not going to reference this section, we can safely remove this from the configuration files
Step 2: Adding Serilog
To integrate Serilog with our application, we will need to add the following packages
- Serilog.AspNetCore - Base package dedicated for ASP .NET Core integration
- Serilog.Settings.Configuration - Provider that reads from the Configuration object
- Serilog.Filters.Expressions - Used for expression-based event filtering
- Serilog.Sinks.MSSqlServer - Used for writing logs in to one or more files
In the solution explorer window, right-click on the solution and choose Manage NuGet Packages from the context menu. Search for the packages given above and click on install to add it
To add the packages into your projects using .NET CLI, execute the commands given below from the command prompt
dotnet add package Serilog.AspNetCore
dotnet add package Serilog.Settings.Configuration
dotnet add package Serilog.Filters.Expressions
dotnet add package Serilog.Filters.MSSqlServer
Step 3: Added Serilog settings in the configuration file
Now we will modify our appsettings.json file to add the settings for Serilog. In one of the earlier step, we removed the default entries for logging and will add the following instead of that
"Serilog": {
    "MinimumLevel": {
      "Default": "Debug",
      "Override": {
        "Default": "Information",
        "Microsoft": "Warning",
        "Microsoft.Hosting.Lifetime": "Information"
      }
    },
    "WriteTo": [
      {
        "Name": "Logger",
        "Args": {
          "configureLogger": {
            "Filter": [
              {
                "Name": "ByIncludingOnly",
                "Args": {
                  "expression": "(@Level = 'Error' or @Level = 'Fatal' or @Level = 'Warning')"
                }
              }
            ],
            "WriteTo": [
              {
                "Name": "MSSqlServer",
                "Args": {
                  "connectionString": "Server=(localdb)\\MSSQLLocalDB;Database=Employee;Trusted_Connection=True;MultipleActiveResultSets=true",
                  "tableName": "ErrorLogs",
                  "autoCreateSqlTable": true
                }
              }
            ]
          }
        }
      },
      {
        "Name": "Logger",
        "Args": {
          "configureLogger": {
            "Filter": [
              {
                "Name": "ByIncludingOnly",
                "Args": {
                  "expression": "(@Level = 'Information' or @Level = 'Debug')"
                }
              }
            ],
            "WriteTo": [
              {
                "Name": "MSSqlServer",
                "Args": {
                  "connectionString": "Server=(localdb)\\MSSQLLocalDB;Database=Employee;Trusted_Connection=True;MultipleActiveResultSets=true",
                  "tableName": "InformationLogs",
                  "autoCreateSqlTable": true
                }
              }
            ]
          }
        }
      }
    ],
    "Enrich": [
      "FromLogContext",
      "WithMachineName"
    ],
    "Properties": {
      "Application": "MultipleLogFilesSample"
    }
  }
Here we have configured entries for writing logs into two tables depending upon the severity. For the first one, we set up the filter like this
"configureLogger": {
    "Filter": [
        {
        "Name": "ByIncludingOnly",
        "Args": {
            "expression": "(@Level = 'Error' or @Level = 'Fatal' or @Level = 'Warning')"
        }
        }
    ],
Under the WriteTo section, we will need to configure the database connection string, name of the table that will be created for writing the logging information. I have specified different names for the table in the two-section so that it will split the writing operation between the tables depending upon the levels. Also, I have enabled the option to automatically create the tables, so when you run the application for the first time it will create the tables with the following schema.
CREATE TABLE [dbo].[ErrorLogs] (
    [Id]              INT            IDENTITY (1, 1) NOT NULL,
    [Message]         NVARCHAR (MAX) NULL,
    [MessageTemplate] NVARCHAR (MAX) NULL,
    [Level]           NVARCHAR (MAX) NULL,
    [TimeStamp]       DATETIME       NULL,
    [Exception]       NVARCHAR (MAX) NULL,
    [Properties]      NVARCHAR (MAX) NULL
);
Because of the conditions, we specified in the configuration file, only Error, Fatal and Warning types of logs will be written into a table named ErrorLogs. Similarly, for the second one, it will write into the file named InformationLogs if and only if the level is Debug or Information'
Step 4: Integrate Serilog in the application
To configure Serilog in our application, we will modify our Program.cs file to call the Serilog middleware as shown below
public static IHostBuilder CreateHostBuilder(string[] args) =>
    Host.CreateDefaultBuilder(args)
        .ConfigureWebHostDefaults(webBuilder =>
Step 5: Writing logs from the application
Let's modify the IndexModel method in the Index.cshtml.cs file to simulate the call to logger methods which in turns writes information to the files
public IndexModel(ILogger<IndexModel> logger)
{
    _logger = logger;
    _logger.LogInformation("Writing to log file with INFORMATION severity level.");
    _logger.LogDebug("Writing to log file with DEBUG severity level.");
    _logger.LogWarning("Writing to log file with WARNING severity level.");
    _logger.LogError("Writing to log file with ERROR severity level.");
    _logger.LogCritical("Writing to log file with CRITICAL severity level.");

}
If you run the application now, you will see the information in written into different files based on the log levels
ErrorLogs Table

InformationLogs Table

No Comments
Connecting Azure Blob Storage account using Managed Identity
Posted 12/9/2022Securing Azure KeyVault connections using Managed Identity
Posted 11/26/2022Manage application settings with Azure KeyVault
Posted 11/9/2022Adding Serilog to Azure Functions created using .NET 5
Posted 4/3/2021Learn how to split log data into different tables using Serilog in ASP.NET Core
Posted 4/23/2020